
YouTube is the second most used and preferred website online, with 2,240.03 million users worldwide. There is massive potential for video content for brands, but it becomes crucial to make their content stand out. Besides creating video content, click-worthy thumbnails, and branding your channels, there is one more thing that can help you differentiate your content: creating and inserting a watermark in youtube videos.

Image: (Source)
It is a common part of an innovative workflow to watermark designs and photos; however, video content reigns and watermarking is on the rise. Watermark adds a professional and branded look to your videos. Besides, it helps to prevent your video content from being stolen and drive more sales and viewers for the same.
You can create your own watermarks following a few simple steps. All you need is creative text, logos, and graphics to design your watermark. You can even choose to leverage the advanced YouTube features to create and insert a watermark in your YouTube videos.
What is a YouTube Watermark?
YouTube watermark simply means adding small branded images across the videos. You can use the YouTube feature to incorporate a watermark in your video and reinforce your branding; you can even choose to use call-to-action to turn viewers into subscribers. You can choose to add a watermark in the bottom right of the screen or in the center. Make it clickable to enable viewers to subscribe from there directly.
Different Types of YouTube Watermarks
- Company logo
- Follow or subscribe to graphic
You Can Set it to Show YouTube Watermark
- at the beginning of the videos
- at the end of the videos
- to the entirety of videos
If you are looking to grow your brand on YouTube, a company logo is the easiest way. If you have a square version, you can work on a transparent background. You can add call-to-action to subscribe if viewers end up hovering over the video.
Major Reasons to Use YouTube Video Watermark
Watermark is a little logo right in the corner which has a major purpose for service. Check a few of the major reasons that justify why you need to utilize the YouTube video watermark.
Professional Outlook
Make your content authentic and professional. The watermark embedded in the branded video shows your medication and professionalism in your work.
Brand Recognition
Watermark helps you give a visual avatar and highlight your brand that helps the audience remember your brand clearly. It boosts the channel’s branding and name.
Optimized Protection
Business video productions help you get the work done speedily and faster. Watermark enables you to protect your video content from being copied and stolen.
Grow Your audience
Watermark enables you to add a link to the YouTube channel, which allows the viewers to become a subscriber. This helps you create strong relationships and trust your viewers.
How to Make & Add a Watermark to Your YouTube Videos
Basically, there are two ways to create and add a watermark to your YouTube video; these include:
- Way to add watermark or logo to existing videos
- Learn to add a watermark or logo to the video before uploading
Let’s look at the step-by-step process to have deep insight into how to create and add a watermark to your YouTube videos.
Adding Watermark or Logo to Existing Videos
You can quickly add a watermark or logo to your previously uploaded content. You just need to create and save the watermark outside through the video editing program. Sign in or log in to your account, and hit on the thumbnail image available at the top right corner.
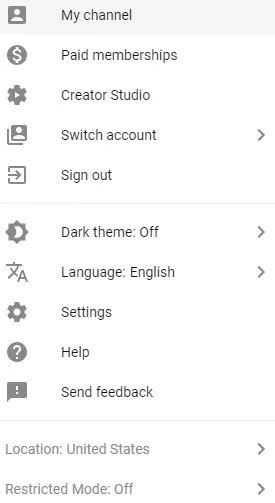
Now you can see the drop-down menu; click tap on the setting option. This will definitely lead you to the help center. Now choose to click on “view additional features.”
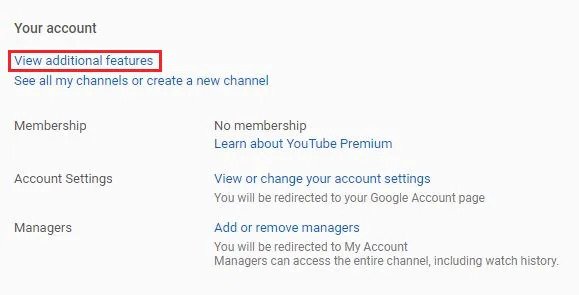
You can click on the “branding” option. Now click on the “add watermark” option to finish the setting; choose an image of your choice from your smart device. Once your image is saved, click on the “save” option.

Your video watermark should be square and transparent. Keep it more extensive than 50×50 pixels to make it appear in the right corner of the videos. You can set the starting time for your watermark and choose to make it appear only at the end of a video or entire video.
Once you click on “update,” apply the watermark to the video. Many suggest the watermark has one color, but the point is not to use anything flashy that takes attention away from the video; hence make sure to use more than three colors, especially when your design is subtle.
Adding Watermark or Logos to the Video Before Uploading it
Whether you are looking to upload your content on OTT Platform Script or YouTube, it must have your brand logo that ensures your ownership of it. You can choose to add logos or a watermark to the video before uploading it.
Wondershare Filmora
It is an ideal video editing tool when it comes to watermarking videos. It helps to add static and watermarks; the main theme of watermarking is the concept of picture-in-picture. You can follow a few of the essential steps to add a watermark:
- Add the watermarking data by drag dropping into the workspace;
- Drag the video on the timeline and edit the watermark on it;
- Add pre-made special effects and adjust the watermark to it;
- Mask in the watermark shape you like;
- Save video
Windows Movie Maker
It is the default windows software that can add watermarks to videos to secure the copyrights. It caters mainly to two types of watermarks: text and images. It supports GIF, PNG, and other such format files and doesn’t support transparency. However, in Windows Logo Locator, an external file is required for placing the logo in various positions.
How to Add Watermark to Your Brand Video with Windows Movie Maker
- Open window movie maker
- Tap on “videos” under the imported title
- Import video to the timeline
- Import category of edit, you will search “titles and credits,” click
- Enter a watermark to the text;
- Choose font, transparency, and positioning
- Add title
You can find the title along the timeline length. You can easily drag it to expand and view it during the length of the video, choose the file and hit the publish video option.
Add Watermark to Image:
- The image must be in .GIF and .PNG format;
- Save the image on the location of your choice;
- Download a logo;
- Select the logo location in your video where you want to appear it;
- Choose logo and screen size;
- Enter the name of a file of watermark you had saved with the extension
- Now copy the text and paste it into the notepad and save the file
- Now open window movie maker
- Select titles and credits underneath the “edit” option
- Click on the space bar and then “change the title animation.”
- You can check the image; once it’s done, click on publish option.
Bottom Line
Creating and editing a watermark on your YouTube video is quite a quick and straightforward process. Lots of tools and modern techniques can help you perform all the tasks efficiently. You can choose the one that satisfies all your video and image editing requirements, including funky filters, speed adjustments, and more, helping you to create fun and entertaining content with your brand logo.